
There are a few different ways to connect a microphone to a speaker, and the right method depends on the type of mic and speaker you’re using, along with what audio input and output ports are available.
In general, you have three main options: a wired connection, a wireless connection, or going through an audio interface. This guide covers how each works and walks through the full setup process.
Methods to Connect Mic to Speaker

Wired Connections
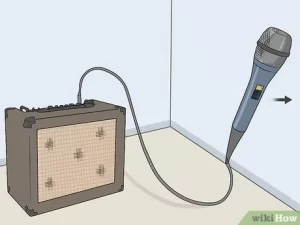
Most wired setups use an XLR to TRS (quarter-inch) cable. The main advantage here is reliability, with no lag between when the audio signal is sent and when it’s heard. The tradeoff is needing a cable long enough to physically reach from the mic to the speaker.
Wireless Connections
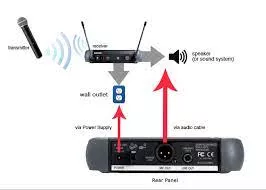
Wireless setups typically rely on a transmitter and receiver pair. The transmitter sends the audio signal wirelessly to the receiver, which then outputs it to the speaker. This gives you flexibility to place the transmitter and receiver anywhere within range of each other, though it can introduce a slight delay between when the signal is sent and when it’s actually heard, making it somewhat less reliable than a wired setup.
If you’re setting up a full wireless system rather than just a single connection, our guide on how to set up a wireless microphone system covers that process in more detail.
An Audio Interface
The third option is using an audio interface, a device that converts the analog signal from a microphone into a digital signal a computer can read. This lets you use a microphone with a computer, which can then send the audio signal out to a speaker.
This method is reliable, with only a slight lag between signal and playback. The downside is needing the actual interface hardware, plus the cables to connect everything, though a USB microphone can sometimes simplify this if you’re using a laptop.
How to Connect Mic to Speaker
- Plug one end of an XLR cable into the microphone and the other end into the audio input port on your audio interface.
- Plug one end of a TRS cable into the speaker and the other end into the audio output port on the interface.
- Turn on both the microphone and the speaker.
- Adjust the levels on the audio interface.
- Fine-tune your microphone levels using the controls on the mic itself alongside the input knob on your audio interface.
If everything is set up correctly, you should be able to hear yourself speaking through the connected speakers.
Connecting a Microphone Directly to a Loudspeaker
Some powered loudspeakers include a built-in microphone input, which can eliminate the need for any additional equipment at all. This is a solid option if you’re willing to invest in a pair of powered speakers specifically.
If your speaker doesn’t have this feature, a mixer is another option. It lets you connect a mic, and the resulting sound from the mixer’s outputs can be routed through either powered or unpowered speakers, the same way a DJ mixer setup typically works.
The other route is through an audio interface. Most modern digital interfaces include at least two inputs, letting you connect more than one microphone or instrument at once.
If your interface has these connections, you can plug the mic into one input and the speaker into the other. Just make sure your interface is configured correctly to avoid picking up unwanted noise or feedback from the speaker.
FAQ
Why would I need a mixer to connect a microphone to a speaker?
Mixers serve several purposes, but in this context, they’re mainly used to amplify the signal from the microphone before sending it to the speaker.
What is an audio interface, and why do I need one?
An audio interface converts the analog signal from a microphone into a digital signal your computer can read, letting you use a microphone with a computer and then send that audio out to a speaker. For more detail, see our guide on what an audio interface is.
What are TRS connections?
TRS stands for Tip, Ring, Sleeve, referring to the three contact points on the plug where the signal flows in or out.
What is an XLR connection?
XLR is the most common connector type for microphones. It’s more reliable than a TRS connection, though it’s also bulkier and less convenient for smaller equipment.
How do I adjust my microphone levels?
If you’d rather skip buying a mixer, you can adjust mic levels directly using the controls on the microphone itself, paired with the input knob on your audio interface.
How do I adjust my speaker levels?
Without a mixer, you can adjust output levels using the volume knob located on the back of the speaker.
Why do I need a direct box?
A direct box is used when connecting an instrument with an unbalanced connection, or no proper connection at all. Since most instruments don’t have balanced outputs, pairing a direct box with an XLR cable typically gives you the best sound.
Conclusion
When connecting your mic and speaker, getting the levels set correctly matters, since mismatched levels can lead to loud, unwanted feedback. If you’re not using a mixer, adjusting the volume directly on the speaker helps you dial in the best sound.
For more on getting clean audio between your mic and speaker setup, see our guides on how to use a headphone mic on PC, how to use a USB microphone on Xbox One, how to hold a microphone, and how to make Blue Snowball sound better.