
Disclosure: GeekSper may earn a commission from qualifying Amazon purchases made through links in this article, at no extra cost to you.
The Shure MV7+ is the best microphone for YouTube under $500 for most desk-based creators. Its close dynamic capture, USB processing, headphone monitoring, and XLR output suit talking-head videos, commentary, tutorials, courses, and voiceovers. Choose the DJI Mic 3 for vlogging and interviews, the RØDE VideoMic NTG for camera-mounted recording, the Elgato Wave:3 MK.2 for livestreaming, or the FIFINE AM8 for a lower-cost desk setup.
The correct microphone depends on where it can sit, how much the presenter moves, what device records the audio, and how noisy or reflective the location is. A $400 studio microphone placed too far away can produce less usable speech than a much cheaper microphone positioned close to the speaker.
Quick comparison of the best YouTube microphones under $500
| Microphone | Best for | Format | Connection | Main tradeoff |
|---|---|---|---|---|
| Shure MV7+ | Talking heads and voiceovers | Dynamic cardioid | USB-C and XLR | Needs close placement and a separate mount |
| DJI Mic 3 | Vlogs, interviews, and moving presenters | Wireless wearable system | Receiver, USB-C, 3.5 mm, and supported DJI devices | Visible transmitter and battery management |
| RØDE VideoMic NTG | Camera-mounted or boomed video | Supercardioid shotgun | 3.5 mm and USB-C | Distance still reduces voice clarity |
| Elgato Wave:3 MK.2 | Livestreams and screen recordings | Cardioid condenser | USB-C | Captures more room sound than a close dynamic mic |
| FIFINE AmpliGame AM8 | Budget desk setups | Dynamic cardioid | USB-C and XLR | Simpler processing and inactive controls over XLR |
How we selected these microphones
We started with the YouTube workflow, not the highest specification. The shortlist had to cover desk recording, mobile filming, camera use, livestreaming, and a lower-cost beginner setup. Each exact model was listed below $500 when reviewed on July 15, 2026.
We compared current manufacturer specifications, connection requirements, monitoring, backup options, mounting, software, and verified Amazon product identities. We did not assign laboratory sound scores or claim identical hands-on testing. Our complete process is explained in How We Test Microphones.
Each product was then assessed using six buying factors:
- Use-case fit: Whether the microphone solves a specific YouTube recording problem.
- Placement: How close it can stay to the speaker and how it affects the camera frame.
- Room and location: Whether the setup is practical in a bedroom, office, studio, or outdoor location.
- Workflow: Device compatibility, monitoring, mute controls, software routing, and backup recording.
- Total setup cost: Extra spending on an arm, stand, interface, cable, adapter, or wind protection.
- Current product status: Manufacturer support and a verified Amazon listing for the exact model.
Microphone categories can overlap, but they are not interchangeable. Our guide to the types of microphones explains how dynamic, condenser, lavalier, shotgun, USB, XLR, and wireless designs differ.
1. Shure MV7+: Best overall microphone for YouTube under $500
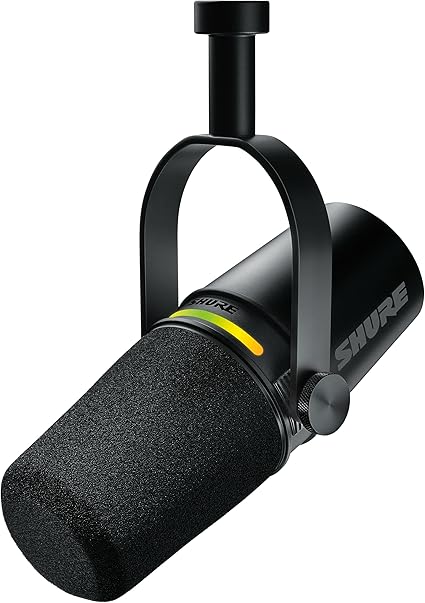

The Shure MV7+ is the strongest overall choice for a solo creator who records at a desk and keeps the microphone near the mouth. Its dynamic cardioid capsule is suited to close speech. That positioning improves the ratio of direct voice to room sound, which is useful in normal bedrooms and offices.
USB-C mode provides Auto Level, a real-time Denoiser, Digital Popper Stopper, EQ, compression, and tone controls through Shure’s MOTIV software. The LED touch panel works as a level meter and mute control, while the 3.5 mm output supports real-time headphone monitoring.
XLR makes the MV7+ easier to retain when a channel adds an interface, mixer, or second microphone. However, the passive XLR signal does not carry the USB processing. Creators moving from USB to XLR must handle gain, EQ, dynamics, and noise control elsewhere in the signal chain.
Best fit
- Talking-head videos recorded at a desk.
- Commentary, tutorials, courses, reviews, and voiceovers.
- Creators working in untreated or moderately noisy rooms.
- Solo channels that want USB now and XLR later.
Limitations
- A desktop stand or boom arm is a separate purchase with the base microphone.
- It works best close to the mouth, so it may remain visible in the frame.
- It is not the right format for walking presentations or camera-mounted filming.
Verdict: Buy the Shure MV7+ when voice is central to the channel and most recording happens from one position. It offers the best balance of room control, simple USB operation, monitoring, and long-term expansion in this list.
2. DJI Mic 3: Best wireless microphone for YouTube

The DJI Mic 3 is the better choice when the presenter walks, demonstrates a product, records outdoors, or interviews another person. The two-transmitter kit keeps a microphone close to each speaker while the camera or phone remains farther away. That consistent distance is its main advantage over an on-camera microphone.
DJI supports 24-bit and 32-bit float internal recording, dual-file recording, adaptive gain control, two levels of noise cancelling, voice tone presets, and integrated timecode. Each transmitter can create an internal backup, which protects a production when the wireless link or camera input has a problem.
32-bit float provides more level-recovery flexibility in post-production, but it cannot fix poor microphone placement, wind hitting the capsule, clothing rub, or distortion created before the signal is recorded. Attach the transmitter securely, use suitable wind protection, and record a short movement test before the full take.
Best fit
- Vlogs, travel videos, demonstrations, and outdoor content.
- Two-person interviews and mobile productions.
- Creators who need internal backup recording.
- Presenters who must keep a desk microphone out of the frame.
Limitations
- The transmitter can be visible on clothing unless it is carefully concealed.
- Batteries, wireless pairing, adapters, and file management add more failure points.
- Clothing movement and wind require attention during placement.
Verdict: Choose the DJI Mic 3 when freedom of movement matters more than the simplicity of a wired desk microphone. It is the most production-flexible option here for vloggers and interview channels.
3. RØDE VideoMic NTG: Best camera microphone for YouTube

The RØDE VideoMic NTG suits creators who want one directional microphone for a camera, smartphone, computer, or boom. Its supercardioid pattern focuses on sound from the front. It connects through an auto-sensing 3.5 mm output or USB-C, and the 3.5 mm jack becomes a headphone output in USB mode.
Onboard controls include continuously variable gain, 75 Hz and 150 Hz high-pass filters, a minus 20 dB pad, high-frequency boost, and a safety channel. The internal battery is rated for more than 30 hours, and the microphone weighs 94 g, which keeps a camera rig manageable.
A shotgun pattern does not make distance irrelevant. If the camera is across a large room, the microphone will still capture more reflections and less direct voice. Mount it on a boom close to the speaker when possible, or choose a wireless system when the subject moves.
Best fit
- Camera-mounted vlogs, tutorials, and documentary-style filming.
- Creators who want one microphone for camera and USB use.
- Small productions that can place the microphone on a boom.
- Filming where a wearable transmitter would be distracting.
Limitations
- Camera distance can still create hollow or reverberant speech.
- Outdoor use may require stronger wind protection than the supplied foam windshield.
- USB-C or Lightning phone setups may need the correct cable or adapter.
Verdict: Buy the VideoMic NTG when the microphone must live on a camera or boom. Its 3.5 mm and USB connections make it more versatile than a camera-only shotgun.
4. Elgato Wave:3 MK.2: Best microphone for YouTube livestreaming

The Elgato Wave:3 MK.2 is built for creators who manage a microphone, browser, game, music, call, alerts, and capture software at the same desk. Wave Link can create separate mixes for the stream, recording, monitoring, and calls. That routing is more valuable to a livestreamer than an XLR output that may never be used.
The cardioid condenser records at 24-bit and 48 kHz. Elgato lists Clipguard 2.0, Auto Gain, onboard DSP, VST inserts, an internal pop filter, a multifunction dial, tap-to-mute, and a 3.5 mm headphone output. The current MK.2 model replaces the original Wave:3 in this 2026 guide.
Its condenser capsule is more sensitive to keyboard noise, fans, and reflections than a close dynamic microphone. Keep it within a practical speaking distance, lower the gain, and test the complete Wave Link routing before going live. Software cannot recover a microphone channel that was never sent to the recording mix.
Best fit
- YouTube livestreams with several computer audio sources.
- Screen recordings, gaming, reactions, and live tutorials.
- Creators who want direct monitoring and onboard processing.
- Quiet desks where a condenser microphone is practical.
Limitations
- USB-C only, with no XLR output.
- More room-sensitive than the MV7+ or AM8 when all are placed correctly.
- Wave Link offers extensive control but requires careful setup and testing.
Verdict: Choose Wave:3 MK.2 when live routing and multiple computer audio sources are central to the channel. Choose the MV7+ when direct voice capture in a normal room matters more than routing.
5. FIFINE AmpliGame AM8: Best budget microphone for YouTube

FIFINE AmpliGame AM8 USB/XLR Dynamic Gaming Microphone
The FIFINE AM8 is the practical entry point for a creator who records at a desk and wants to reserve money for lighting, a camera, a boom arm, or room improvements. It uses a dynamic cardioid capsule and offers both USB-C and XLR connections.
USB mode provides a headphone output, gain control, monitoring control, mute, and optional RGB lighting. FIFINE recommends speaking into the top of the microphone from about 2 to 6 inches away. That close placement is important because increasing the distance also increases the amount of room sound needed to reach a usable level.
XLR provides a path to an interface or mixer, but the RGB, mute button, and function controls are inactive in XLR mode. An XLR cable is not included with the base microphone. Buyers planning an immediate XLR setup should add the cable and interface to the real cost.
Best fit
- New YouTube channels building a complete desk setup.
- Talking heads, commentary, gaming, and basic voiceovers.
- Creators who want USB now and XLR compatibility later.
- Untreated rooms where close placement is possible.
Limitations
- Fewer automatic processing tools than the Shure MV7+.
- The base model may still need a better arm or stand.
- USB controls do not operate through XLR.
Verdict: Buy the AM8 when the complete creator setup matters more than owning the most expensive microphone. Correct placement plus a stable arm can make it a better purchase than a premium microphone left far from the speaker.
Which YouTube microphone should you choose?
| Your recording style | Best choice | Why |
|---|---|---|
| Seated talking heads or voiceovers | Shure MV7+ | Close dynamic capture with USB processing and XLR expansion |
| Walking, vlogging, or two-person interviews | DJI Mic 3 | Consistent wearable placement and internal backup recording |
| Camera-mounted or boomed video | RØDE VideoMic NTG | Directional capture with 3.5 mm and USB operation |
| Livestreams with several computer sources | Elgato Wave:3 MK.2 | Wave Link routing, monitoring, and onboard processing |
| First desk setup on a lower budget | FIFINE AM8 | Dynamic USB and XLR design at a lower system cost |
Choose by microphone distance before specifications
Distance is the first buying decision. If the microphone can remain 2 to 6 inches from a seated speaker, a dynamic desk microphone such as the MV7+ or AM8 is easy to control. If the presenter walks or turns away from the camera, a wireless wearable system keeps the capsule at a more consistent distance.
A shotgun microphone is useful on a camera or boom, but it should still be kept as close as the shot allows. Directionality reduces sound arriving from some angles. It does not remove reverberation or make a distant voice sound close.
All microphones convert sound into a recordable signal, but placement changes how much direct voice and room sound reach the capsule. Our guide to how a microphone works explains this signal path.
Dynamic or condenser microphone for YouTube?
A dynamic microphone is usually the safer desk choice in an untreated room because it is normally used close to the mouth with moderate gain. This does not make it noise cancelling. The improvement comes from close placement and a stronger direct voice relative to the room.
A condenser microphone captures detail well in a quiet, controlled space but can also reveal keyboard noise, fans, and reflections. Read What Is a Condenser Microphone? for a fuller explanation of its sensitivity, uses, and power requirements.
USB or XLR for a YouTube channel?
USB is the correct starting point for most solo creators. It connects directly to a computer and can include monitoring, mute controls, automatic gain, and software processing. XLR becomes useful when a channel adds several microphones, an audio interface, a hardware mixer, or a permanent studio signal chain.
The MV7+ and AM8 support both formats, but their USB features do not all transfer to the analog XLR output. Compare the practical costs in Choosing the Right Microphone: USB or XLR.
Plan the complete YouTube audio setup under $500
The product price is only part of the budget. A usable setup may need the following additions:
- Desk microphone: Boom arm or stand, headphones, pop protection, and possibly an XLR interface.
- Wireless system: Correct phone or camera adapter, wind protection, charging routine, and secure mounting.
- Shotgun microphone: Camera shoe or boom, extension cable, wind protection, and headphone monitoring.
- Room setup: Curtains, rugs, furniture, and soft surfaces to reduce strong reflections.
- Backup: A second recording path for interviews, live events, and one-time demonstrations.
Do not spend the full $500 on the microphone if doing so leaves no budget for correct placement or monitoring. Moving a suitable microphone closer usually creates a larger improvement than replacing it with a more expensive model at the same poor distance.
YouTube microphone setup checklist
- Place the microphone as close as the shot and format allow.
- Aim the correct side or end of the microphone at the speaker.
- Set gain while speaking at the loudest realistic volume.
- Leave headroom for laughter, emphasis, and reactions.
- Run the camera, computer, lights, fans, and air conditioning during the test.
- Monitor for plosives, wind, clothing rub, keyboard noise, and desk vibration.
- Confirm the correct microphone is selected in every recording application.
- Record 30 seconds and play it back before the full take.
- Create a local backup for interviews and livestreams when possible.
Frequently asked questions
What is the best microphone for YouTube under $500?
The Shure MV7+ is the best overall microphone under $500 for desk-based YouTube videos because it combines close dynamic capture, USB processing, monitoring, and XLR expansion.
Do I need to spend $500 on a YouTube microphone?
No. A lower-cost microphone such as the FIFINE AM8 can produce usable YouTube speech when it is placed close, set to a sensible gain level, and supported by a stable mount and basic room control.
What microphone is best for an untreated room?
A close dynamic microphone such as the Shure MV7+ or FIFINE AM8 is usually easier to control in an untreated room than a condenser microphone placed farther away.
Is a wireless or shotgun microphone better for YouTube?
A wireless microphone is better for moving presenters and interviews, while a shotgun microphone is better when the microphone must stay on the camera or a boom and remain out of the shot.
Can I keep a YouTube microphone outside the camera frame?
Yes, but a distant desk microphone will capture more room sound. Use a wireless wearable microphone or place a shotgun microphone on a boom just outside the frame when visual cleanliness matters.
Does 32-bit float guarantee clean YouTube audio?
No. It provides more flexibility for recovering recording levels, but it cannot fix wind, clothing rub, poor placement, strong room reflections, or distortion that occurs before the signal is stored.
Final recommendation
Buy the Shure MV7+ for seated talking heads, tutorials, commentary, courses, and voiceovers. Choose the DJI Mic 3 for vlogs and interviews, the RØDE VideoMic NTG for camera or boom use, the Elgato Wave:3 MK.2 for livestream routing, or the FIFINE AM8 for a lower-cost desk setup.
The best YouTube microphone under $500 is the model that stays close to the speaker, connects to the actual recording device, fits the camera frame, and leaves enough budget for mounting, monitoring, and wind or room control.
Specification sources
Product features were checked against the official pages for Shure MV7+, DJI Mic 3, RØDE VideoMic NTG, Elgato Wave:3 MK.2, and FIFINE AM8. Check the linked Amazon product cards for current prices, seller details, and availability.